- It's perfectly acceptable for RSA AM 7.1 to take approximately 15 minutes to start up thanks to Java and the 'new' Oracle Database backend. About 13 minutes of the delay is at "Applying Computer Settings". (Even with 2vCPU's and 4GB RAM).
- Give the server 4GB of RAM if possible even though RSA only recommend 2GB, that way all the services will be able to start at boot up
- When installing a Replica Instance, you'll need the replica package creating on your Primary Instance and also a copy of your RSA License certs handy. Also make sure that there is connectivity from it to your existing Primary Instance and any other Replica instances that you may have. TCP port 2334 will need to be open if you've got a firewall or two in the way.
- I'm not really having a great deal of luck with RSA AM 7.1, I'm finding it very finicky in terms of connecting Replica instances to the Primary. I'm considering another rebuild of the VMs so that I'm happy that they're working as they should. I've also experienced my Primary Instance running out of disk space eventhough it had 30GB set aside just for Authentication Manager.
- I've rebuilt my Primary and Replica now and they seem to be a little more stable. I've noticed that by default AM will assume that there is 100GB of disk available for replication. Now apparently this can be changed by following the directions in Appendix G of the Administrators PDF. I cannot find the relevant instructions although I am wondering if it can be achieved using rsautil manage-database and resizing the database files. Update - I've found that I was referring to the old documentation for the above problem. Please see my most recent post to resolve this issue.
10 Feb 2010
RSA Authentication Manager 7.1 on VMware ESX 3.5
I'm right in the middle of an RSA Authentication Manager 7.1 SP2 deployment onto VMware ESX 3.5 as I type and having stumbled across some "gotcha's" already, I've decided to note them as I go.

26 Jan 2010
Associate the employeeID attributed with the user class in AD
In preparation for our new HR system, I linked the existing employeeID attributed in our AD Schema to the user class. This allows the storing of employee IDs in Active Directory for each user. A quick guide can be found here
14 Jan 2010
VMware ESX 3.5 and Storage VMotion
We're in the process of expanding the capacity of our production SAN and consequently have to do some shuffling of data between disk groups and LUNs. The first step in the migration was to move the VMs on our production cluster to some newly provisioned LUNs. Initially I envisaged powering down each VM and then selecting to Migrate it and selecting to relocate it's disks as part of the migration process from within the VI client. I didn't fancy this option too much due to the time it would take and the incurred downtime and therefore it would also be more than likely have to be done at a weekend, of which I have very few of as it is.
I'm just cutting my teeth on VMware's PowerCLI so decided to see if I could at least script the process rather than drowning in GUI hell. I found that I could go one better and summon Storage VMotion using PowerCLI. The blurb in the VMware PDF states that;
Sounds exactly what i'm after. You have the choice of leveraging Storage VMotion using either an unofficial VI Plugin (not ideal for production), VMware's RemoteCLI or PowerCLI. I mapped out the source and destination LUN's and moved a few VM's at a time by running the following PowerCLI command. While this took sometime to run for each VM, I didn't want to push my luck and was careful of the additonal I/O on the LUN's source LUNs.
Get-VM "VM_Name" | Move-VM -Datastore "New_DataStoreName" -RunAsync
A new task should appear in the VI Client indicating that the VM's storage is being relocated. While this is happening the VM is available and able to function as expected.
I'm just cutting my teeth on VMware's PowerCLI so decided to see if I could at least script the process rather than drowning in GUI hell. I found that I could go one better and summon Storage VMotion using PowerCLI. The blurb in the VMware PDF states that;
VMware® Storage VMotion™ enables live migration for running virtual machine disk files from one storage location to another with no downtime or service disruption.
Sounds exactly what i'm after. You have the choice of leveraging Storage VMotion using either an unofficial VI Plugin (not ideal for production), VMware's RemoteCLI or PowerCLI. I mapped out the source and destination LUN's and moved a few VM's at a time by running the following PowerCLI command. While this took sometime to run for each VM, I didn't want to push my luck and was careful of the additonal I/O on the LUN's source LUNs.
Get-VM "VM_Name" | Move-VM -Datastore "New_DataStoreName" -RunAsync
A new task should appear in the VI Client indicating that the VM's storage is being relocated. While this is happening the VM is available and able to function as expected.
13 Jan 2010
Managing Non Domain Integrated DMZ Servers in SCOM 2007 R2
First of all, it's wise to ensure that each of the servers, both the Management and Agent servers have the PKI Certificate chain installed. With an internal PKI such as MS Certificate Services, this can be downloaded from the Certificate Services web interface which is normally http:///certsrv. click the 'Download a CA certificate, certificate chain, or CRL' link, followed by the 'Download CA certificate chain'. A prompt to download the certnew.p7b file which is the certificate chain will appear. The certificate chain should be imported into each Management Server and also DMZ Server as required, using the MMC and Certificates snapin.
To faciliatate the mutual authentication, a new certificate template is required but this will require an Enterprise PKI configured. The MS TechNet article covers the configuration required.
Each SCOM Management Server will require an instance of the newly created OperationsManager Certificate. This can be again be requested from the MS Certiifcate Services Web interface. Navigate to the URL (Normally http:///certsrv) and select 'Request a certificate' and then 'Create and submit a request to this CA.' Select the newly created OperationsManager template from the drop down. It is important that both the 'Name' and 'Friendly Name' fields match the name either FQDN or just NetBIOS of the server. Ensure that that the certificate is installed to the Local Computer Certificate Store on each Management server.
The above step is also required for each DMZ Server which is to host an Agent. It's worth ensuring that the 'Mark keys as exportable' options is checked. This will allow the exporting of the certificate from your local machine to the destined DMZ server. Don't delete the .pfx certificate once imported into the server's local store as it's required for the MOMcertimport.exe step.
Additional steps to ensure that name resolution can take place maybe required depending upon your configuration. Due to my DMZ configuration, I used HOST file entries on the DMZ server with the Management Servers' names and IP addresses and also on the Management servers for the DMZ Servers name's and IP addresses.
In order to install the Agent, I found that MSXML 6 was required followed by the manual GUI install of the Agent. I left all options as standard as part of the install. Once finished, I then ran a second install using the command line which loosely resembled the following. This command defines the Management Group(s) and associated management server as the details cannot be retrieved from Active Directory in this case.
MsiExec.exe /i MOMAgent.msi /norestart /qn MANAGEMENT_GROUP="ManagementGroupName" MANAGEMENT_GROUP_OPERATION=AddConfigGroup MANAGEMENT_SERVER_DNS=ManagermentServer REINSTALL=ALL
In order to import the Operations Manager certificate into SCOM, the MOMcertimport.exe utility is required. While there are many published commands on the Internet, I found the following worked for me. MOMcertimport.exe "Path to the exported Cert with private key".
Once entered you should be prompted for the Private Key password that you previously specified when exporting the certificate to the .pfx format. A successful imported message should appear. You can also check that the certificate was imported correctly by checking the registry on the server. HKEY_LOCAL_MACHINE\SOFTWARE\Microsoft\Microsoft Operations Manager\3.0\Machine Settings\ChannelCertificateSerialNumber should contain the Serial number of the certificate that you've imported. It's worth restarting the Agent's service to pick up the newly imported certificate.
An 'Run as Account' is required for SCOM, so that it can run tasks on the DMZ based server. This requires a Local account creating which has Administrative rights on the server. The details of the account then need creating in the SCOM Management console. A new Run As account can be created by going to 'Administration' and then under 'Run As configuration', right click Accounts and select 'Create new Run As account'. Set the options as follows in the wizard.
Run As account Type - Action Account
Display Name - Action Account
Username -
Password -
Domain -
Click 'Next' then 'Create' to finish the account configuration.
Lastly the account configuration requires configuring so that SCOM knows to use the new account when communicating with the DMZ based server. This can be done by going to 'Profiles' under Run As Configuration and finding the 'Default Action Account' option. Double click 'Default Action Account' and find the new server in the list. Double click the server and select the newly created 'Run As account' and click 'Save' and 'Close'.
It's probably best to restart the System Center Management service on the DMZ Server so that it can detect the changes made to the SCOM console. That should be it, happy DMZ Management.
To faciliatate the mutual authentication, a new certificate template is required but this will require an Enterprise PKI configured. The MS TechNet article covers the configuration required.
Each SCOM Management Server will require an instance of the newly created OperationsManager Certificate. This can be again be requested from the MS Certiifcate Services Web interface. Navigate to the URL (Normally http://
The above step is also required for each DMZ Server which is to host an Agent. It's worth ensuring that the 'Mark keys as exportable' options is checked. This will allow the exporting of the certificate from your local machine to the destined DMZ server. Don't delete the .pfx certificate once imported into the server's local store as it's required for the MOMcertimport.exe step.
Additional steps to ensure that name resolution can take place maybe required depending upon your configuration. Due to my DMZ configuration, I used HOST file entries on the DMZ server with the Management Servers' names and IP addresses and also on the Management servers for the DMZ Servers name's and IP addresses.
In order to install the Agent, I found that MSXML 6 was required followed by the manual GUI install of the Agent. I left all options as standard as part of the install. Once finished, I then ran a second install using the command line which loosely resembled the following. This command defines the Management Group(s) and associated management server as the details cannot be retrieved from Active Directory in this case.
MsiExec.exe /i MOMAgent.msi /norestart /qn MANAGEMENT_GROUP="ManagementGroupName" MANAGEMENT_GROUP_OPERATION=AddConfigGroup MANAGEMENT_SERVER_DNS=ManagermentServer REINSTALL=ALL
In order to import the Operations Manager certificate into SCOM, the MOMcertimport.exe utility is required. While there are many published commands on the Internet, I found the following worked for me. MOMcertimport.exe "Path to the exported Cert with private key"
An 'Run as Account' is required for SCOM, so that it can run tasks on the DMZ based server. This requires a Local account creating which has Administrative rights on the server. The details of the account then need creating in the SCOM Management console. A new Run As account can be created by going to 'Administration' and then under 'Run As configuration', right click Accounts and select 'Create new Run As account'. Set the options as follows in the wizard.
Run As account Type - Action Account
Display Name -
Username -
Password -
Domain -
Click 'Next' then 'Create' to finish the account configuration.
Lastly the account configuration requires configuring so that SCOM knows to use the new account when communicating with the DMZ based server. This can be done by going to 'Profiles' under Run As Configuration and finding the 'Default Action Account' option. Double click 'Default Action Account' and find the new server in the list. Double click the server and select the newly created 'Run As account' and click 'Save' and 'Close'.
It's probably best to restart the System Center Management service on the DMZ Server so that it can detect the changes made to the SCOM console. That should be it, happy DMZ Management.
16 Nov 2009
Configuring Applications to connect to SQL Servers on Non Standard SQL Ports
Following MS Best Practice, we always try to change the default Port used by our SQL Servers. Middleware and front end servers which connect to the SQL Servers can normally use the SQL Browser (UDP 1434) to find the port used by an instance. If you happen to have disabled the SQL Server Browser service or maybe have a firewall in between the SQL server and client, then the port that a SQL Instance resides on can be defined along with a suitable alias.
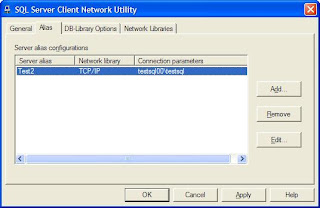
To do this use the 'SQL Server Client Network Utility' by going to Start > Run > cliconfg.exe and choose the 'Alias' tab. To add a new association of server alias and port click 'Add' and enter the relevant details. I shall never have to Google this again now :o)

To do this use the 'SQL Server Client Network Utility' by going to Start > Run > cliconfg.exe and choose the 'Alias' tab. To add a new association of server alias and port click 'Add' and enter the relevant details. I shall never have to Google this again now :o)
26 Oct 2009
Get SQL Database File Size Information
I had a query from a colleague this morning regarding the size of a database on one of our SQL Server 2005 clusters. He wanted to know whether it had run out of space, as the database is not configured to grow automatically.
I queried the 'sys.database_files' view on the database in question in order to determine it's current size, only to find what I thought to be a mismatch between what values were being returned in the size, max_size and growth fields and those returned from the SSMS GUI. Upon reading the MSDN article for sys.database_files, it appears that the values that are returned don't represent the actual file size but the file size in 8KB pages. Therefore I've concocted a SELECT statement which can be executed against a database and will return what I think is the more pertinent values in their expected form.
SELECT name as [SQL Logical Name], physical_name as [File Path],
size * 8/1024 as [Current Size (MB)],
max_size * 8/1024 as [Maximum Size(MB)],
growth * 8/1024 as [Growth Increment (MB)]
FROM sys.database_files
As someone who dabbles with SQL (usually when something's went wrong), I find the above T-SQL very useful for assessing database sizes.
I queried the 'sys.database_files' view on the database in question in order to determine it's current size, only to find what I thought to be a mismatch between what values were being returned in the size, max_size and growth fields and those returned from the SSMS GUI. Upon reading the MSDN article for sys.database_files, it appears that the values that are returned don't represent the actual file size but the file size in 8KB pages. Therefore I've concocted a SELECT statement which can be executed against a database and will return what I think is the more pertinent values in their expected form.
SELECT name as [SQL Logical Name], physical_name as [File Path],
size * 8/1024 as [Current Size (MB)],
max_size * 8/1024 as [Maximum Size(MB)],
growth * 8/1024 as [Growth Increment (MB)]
FROM sys.database_files
As someone who dabbles with SQL (usually when something's went wrong), I find the above T-SQL very useful for assessing database sizes.
8 Oct 2009
Getting to grips with VMware's PowerCLI
Yesterday I downloaded VMware's PowerCLI installer and started playing with some of the supplied cmdlets. The motivation behind it was to find a simple way of listing all of the current snapshots on our army of VMs. With the best will in the world, we find that the odd snapshot is not removed once we're finished a change and therefore can be in place for weeks before being re-discovered and removed.

The first step in using the PowerCLI cmdlets is to connect to the vCentre or Virtual Centre server and that's done using Connect-VIServer. If the optional arguments are supplied you'll be promped with a login dialog.

Once connected, you then have access to run the cmdlet's that are allowed as per your level of permissions in Virtual Centre. In my case I looked at the Get-Snapshot cmdlet, which accepts a VM name as an argument and returns details of any snapshots associated with the supplied VM name.
Using some basic PowerShell I was able to get a tabular list of all VMs with snapshots, showing the name of the VM, the date that the snapshot was created, the snapshot's name and description. Very handy for quickly finding those forgotten snapshots.
Get-VM * | Get-Snapshot | Select VM, Created, Name, Description
Using PowerShell with VMware looks to make those painful admin tasks easier but there was one 'gotcha' that i noticed. When finished using PowerShell, use the Disconnect-VIServer or your session will stay open on the VC Server.

The first step in using the PowerCLI cmdlets is to connect to the vCentre or Virtual Centre server and that's done using Connect-VIServer

Once connected, you then have access to run the cmdlet's that are allowed as per your level of permissions in Virtual Centre. In my case I looked at the Get-Snapshot cmdlet, which accepts a VM name as an argument and returns details of any snapshots associated with the supplied VM name.
Using some basic PowerShell I was able to get a tabular list of all VMs with snapshots, showing the name of the VM, the date that the snapshot was created, the snapshot's name and description. Very handy for quickly finding those forgotten snapshots.
Get-VM * | Get-Snapshot | Select VM, Created, Name, Description
Using PowerShell with VMware looks to make those painful admin tasks easier but there was one 'gotcha' that i noticed. When finished using PowerShell, use the Disconnect-VIServer
Subscribe to:
Posts (Atom)